|
Sony Playstation 3 Support - Network Help, Broadband Help, Firewall Rules and Configuration, NAT, Online Game Setup
|
![]() |
| Home | About Us | Products | News | Support | Contact |
![]() This section is aimed at helping online gamers configure their broadband router and Playstation 3 (PS3) for online play and connecting to the Playstation Network. There are two stages to configuring your Playstation 3 for online play: Configuring the firewall/port forwarding on your broadband router and setting the Network preferences on the PS3 itself. If you require any additional help or more detailed instructions on setting up and/or configuring your new Playstation 3, then please feel free to contact us for more help. PLEASE NOTE that we can only provide telephone support to our own Orpheus broadband subscribers. Router Firewall/Port Filtering
To access online content such as chat and the Sony Shop the PS3 needs to 'listen' and 'talk' on several 'ports'. You need to ensure that a) your firewall allows data to be sent to these ports and b) it forwards it correctly to your PS3. Configuring the Firewall If you place your Playstation 3 in the DMZ (Demilitarized Zone) of your firewall, then these instructions may not necessarily apply, as your PS3 will be outside the secure part of your network, but if you want your Playstation 3 inside a secure firewall inside your network, then these notes may help you configure your firewall ports accordingly. Although these instructions are written using the Orpheus supplied 'Billion' routers, they're written in a generic style so that you should be able to follow if you have a different router. The PS3 requires the following port settings:-
Go to the Firewall 'port filters' part of your router configuration. Ports 80 (HTTP) and 443 (HTTPS) should be open anyway, as they're used for web browsing and secure browsing respectively, so you need to start by configuring the router to allow outgoing traffic on TCP port 5223 (fig 1) ![]() Fig.1 - Creating a new port filter rule to allow TCP traffic on port 5223 The router should supply a set of default settings for the new rule, which you should amend accordingly. Give the rule a name (maybe optional on some routers). The important bits to change are the protocol type (TCP or UDP) so select TCP from the list of menu options. Next you should allow any source port (leave default settings of 0 - 65535) and enter 5223 in both the boxes for the Destination Port. As it's a single port, you should enter the same value in both boxes, so the range will effectively be 5223-5223. Allow Outbound and Inbound connections, then Apply the changes. Now repeat the process for UDP ports 3478 and 3479. Because these are consecutive ports you can define them in a single operation by entering them both in the respective Destination Port range boxes. Figure 2 shows the completed firewall/port filtering setup. ![]() Fig.2 - Completed firewall rules - Note, these include ports for online game MotorStorm (see below) The example here shows two separate rules for the Playstation Network - source ports open as well as destination ports open - but the actual configuration may depend upon your router and firewall settings. If you get the firewall configuration correct in the first place you shouldn't need to specifically setup NAT port forwarding. Online Gaming Sony's online manual doesn't make it entirely clear which ports are required for certain games, which can cause problems connecting, depending upon how secure your firewall is. The following table contains some of the ports required open by some popular games.
N.B. This table is subject to revision as more information is discovered. 
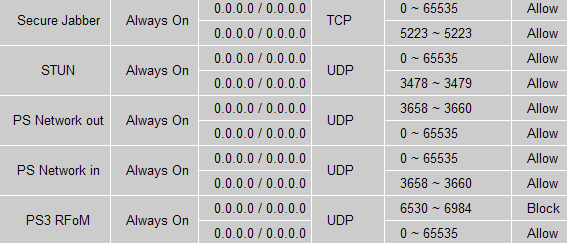
An example showing online gaming ports configured is shown in fig.3 ![]() Fig.3 - Completed firewall rules, with additional rules for online gaming. RFoM settings subject to change since screenshot - see table above for actual values! Once you have configured the various firewall settings on your router, don't forget to Save your router choices by clicking on the relevant save button to ensure that all your changes are programmed permanently into the router. Configuring the Playstation 3 Network Settings (Wired)
From the PS3 XCrossMediaBar (XMB) main screen, or 'Home Menu', select Network Settings and click the 'X' button. Select Internet Connection Settings and click the 'X' button again. Select Wired Connection and then click the right button. (see below for wireless configuration) Select Custom and click the right button. You will now be taken through the steps for manual configuration of the internet settings. I would advise configuring things manually rather than the Easy way of letting it detect things automatically via DHCP, because this will make configuring your firewall and/or port forwarding easier later on. Select the operation mode of the network device. Highlight Auto-Detect and click the right button to move onto the next setting. Select the IP Address Setting. Highlight Manual and click right to move on. You will now see a screen from where you can manually setup your network IP addresses (see fig.4). Enter the IP address that you want to configure your PS3 on. In our example we've used 10.1.1.54 but yours should be a static IP address on your LAN network (maybe 192.168.1.x or something?). Enter the Netmask which will generally be 255.255.255.0 unless you have a different one for your own network. ![]() Fig.4 - Set the PS3 IP addresses The default router should be the IP address of your broadband router or internet gateway. Then enter the name servers as shown in the screenshot. For Orpheus broadband, these are 213.130.128.32 and 213.130.128.33 For MTU select Automatic and click right to continue. For Proxy Server select Do Not Use and click right to continue. For UPnP select Enable (fig.5). Some routers don't support 'Universal Plug and Play', in which case the PS3 should ignore it anyway. Click right to continue. ![]() Fig.5 - Enable Universal Plug 'n' Play You'll now be shown a list of all the settings you've chosen. If everything is correct press the 'X' button to save the settings. Save completed! Now click on Test Connection to make your PS3 perform a network test to see if everything is working ok. If all is well you should see figure 6. ![]() Fig.6 - Test complete! The test should indicate that you have NAT Type 2 which means that online services should all work. If so, you're done! Your PS3 should now be configured for going online, accessing the Sony Shop and joining your favourite online games. So far we've not managed this, using a WPA-SPK wireless router. We're currently investigating where the problem may lie. Check back soon! Other PS3 Resources
|
Sections Computer Systems Game Consoles Status at a glance
|
| WebMail | Hosted Web Sites | Downloads | RSS News | Status |